The importance of maintaining academic ethics and upholding ethical standards
Fixed: Windows Resource Protection Found Corrupt Files Issue
The System File Checker scan or SFC scan is one of the critical tools to help the user overcome the issues occurring due to corrupt Windows system files. It helps identify and repair the system files in a few easy steps. However, what if the SFC scan itself gets into trouble?. So the Windows resource protection found corrupt files issue occurs when the SFC scan malfunctions and cannot fix the system files. While running the SFC scan on their Windows PC, users see the following message indicating that the SFC scan could not repair some of the system files.
“Windows Resource Protection found corrupt files but could not fix some of them. Details are included in the CBS.Logwindir\Logs\CBS\CBS.log.”
Table of Contents
What is Windows Resource Protection System File Check?
The System File Check or SFC is integrated with Windows Resource Protection which guards the registry keys and critical system files. It restores the original file from the cached copy stored in the Windows folder if it detects any protected system file modifications. This helps the OS recover and repair any malfunctioning system file to ensure correct processing.
The SFC feature is used through Command Prompt using the SFC/scannow command to scan all the protected system files and repair them if need be. However, at times Windows Resource Protection detects corrupt system files but finds itself unable to restore those files. The user sees the above error message during the SFC scan in such a case. So this blog will guide you to resolve the issue using some very effective DIY methods and bring your Windows PC back on track.
How to resolve Windows Resource Protection Found Corrupt Files Issue?
Since you are facing the issue of Windows Resource Protection and SFC scan not working properly, you need to implement the following methods one by one. This will fix the problem without any professional or technical assistance.
Method 1: Check and repair the hard drive using the chkdsk command
Although the SFC scan is not functioning properly on your Windows PC, you can still use the command prompt to fix this problem. You need to check the hard drive and repair the persisting errors and bad sectors using the chkdsk command.
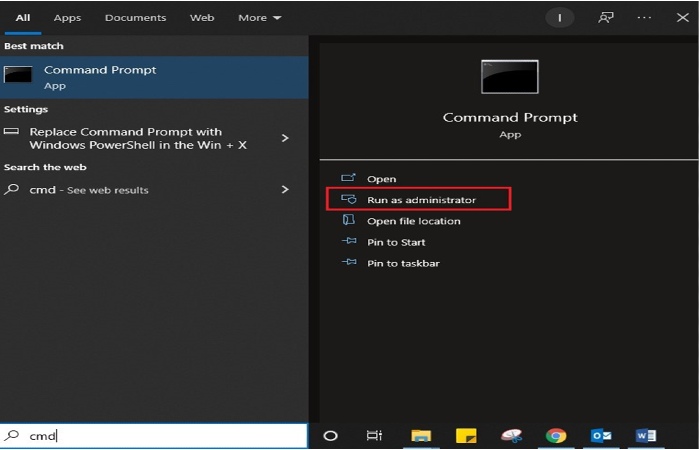
Step 1: Type cmd in the Search bar. Select Run as Administrator under the Command Prompt app.
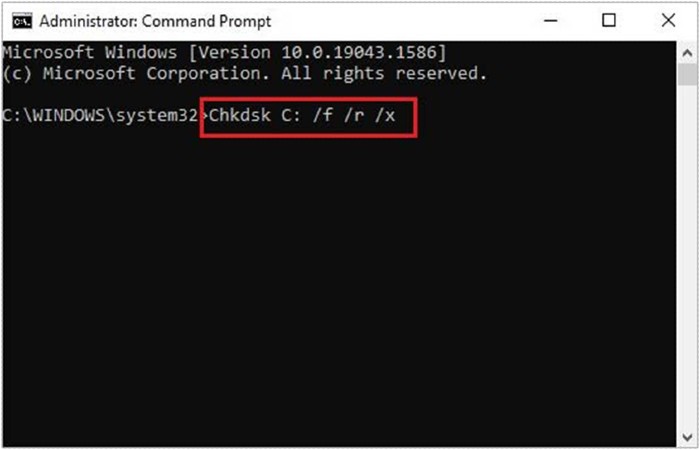
Step 2: Insert the command chkdsk C: /f /r /x(Letter C signifies the letter of the drive to be repaired) and press Enter.
Step 3: The search for errors and bad sectors will commence, and it may take time depending on the extent of issues on your hard drive.
Be patient and let the procedure complete. Now, check if the SFC scan is working correctly.
Method 2: Use the DISM command to repair corrupt files
As the Windows Resource Protection is unable to fix some of the corrupt files it found, you can utilize the Deployment Image Servicing and Management or DISM to do the job. DISM uses the Windows update component to repair the Windows image. Therefore, you need a good quality internet connection to run the DISM command on your PC. Now, follow the steps below.
Step 1: Launch Command Prompt using the Run as Administrator option.
2: Insert command dism /Online /Cleanup-Image /Restore Health in the command line and press Enter.
Step 3: The DISM command will use a Windows Image and scan it to detect any anomalies. Depending on your system configuration and the extent of errors, this will take some time.
Once the scanning process is complete, your OS will repair the problematic files and related data.
Method 3: Run SFC/DISM scan by booting Windows in Safe Mode
By running the SFC command in safe mode, we can identify whether the problem is caused by any internal error or a third-party program on your PC. In the safe mode, only the necessary system programs and services are allowed to function. Thus, if a third-party program causes the issue, the SFC scan will be complete in safe mode. You can run an SFC scan in safe mode as described below.
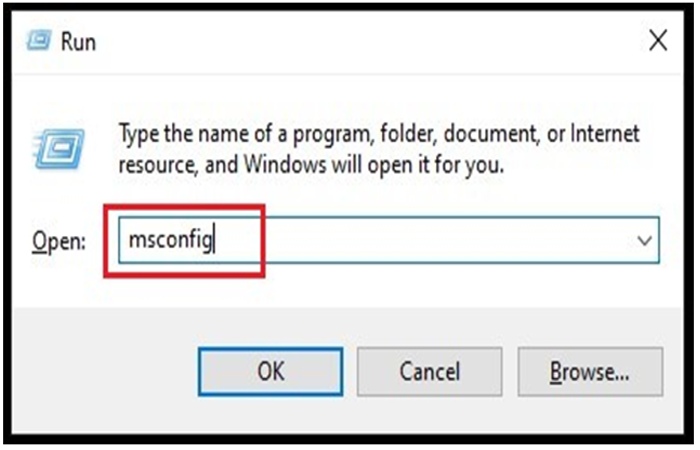
Step 1: Open the Run utility using Windows + R key, and type msconfig, press Enter.
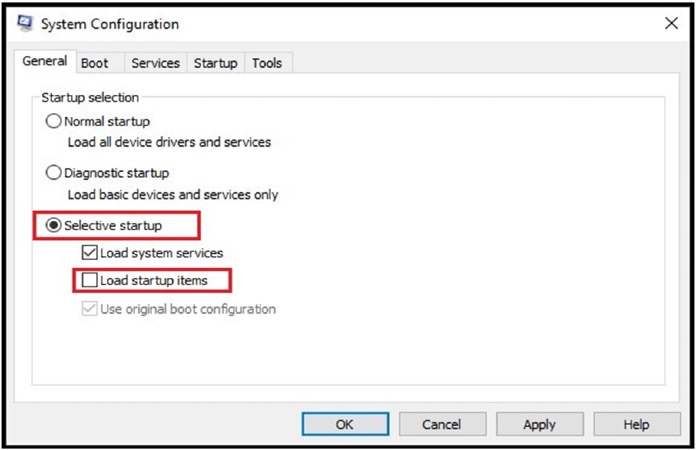
Step 2: In the System Configuration window, select the General tab and choose Selective Startup. Uncheck the box against the Load startup items option and click OK.
Step 3: Clack the Services tab and check the box against Hide all Microsoft services. Now, click Disable all to ensure that no third-party app starts running at the Windows startup.
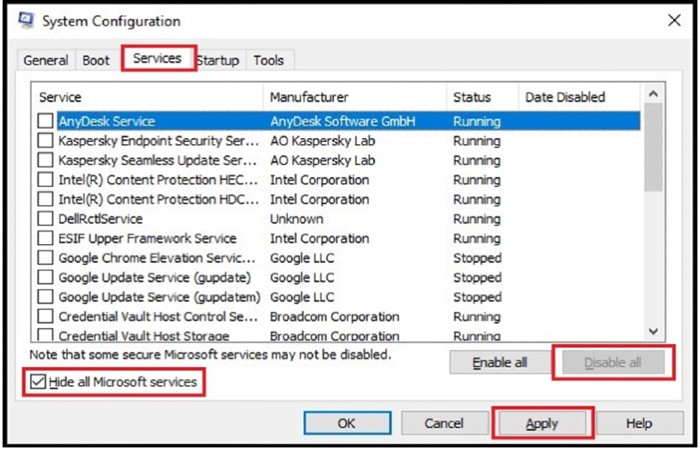
Step 4: Click Apply and restart your PC. Once your PC restarts in safe mode, launch Command Prompt.
Step 5: Run SFC or DISM again using the following commands.
- For SFC scan
SFC /scannow
- For DISM scan
DISM.exe /Online /Cleanup-image /Restorehealth
If the corrupt files are found and repaired successfully in safe mode, some third-party software or app is interfering with the SFC scan in normal mode. Find the app and remove it.
Method 4: Run SFC scan in WinRE
WinRE or Windows Recovery Environment is generally used to repair the common causes behind an unbootable Windows system. However, you can use it to run an SFC scan and fix the files that Windows Resource Protection was unable to repair.
Step 1: Boot your PC from an installation media for the Windows version installed on your computer.
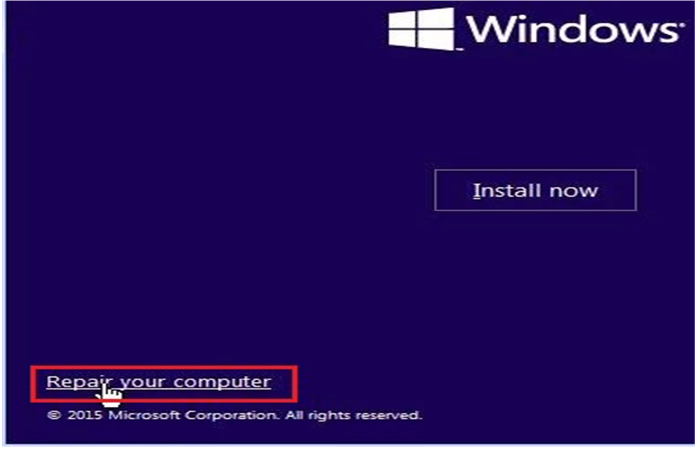
Step 2: The Install Windows screen will appear. Select Repair your computer at the bottom left of the screen.
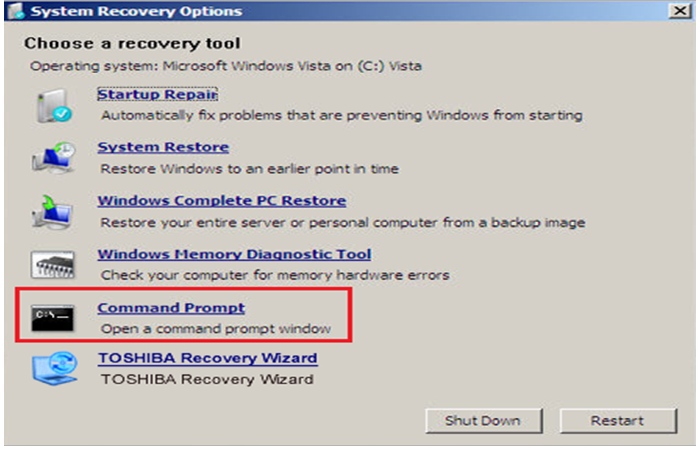
Step 3: Click Nexton the System Recovery Options screen and select Command Prompt.
Step 4: Insert command BCDEditin the command line and press Enter. This let you identify the Drive letter of the system drive, which will displaye next to osdevice.
Step 5: Now, type or copy-paste the command CHKDSK /f D:(Replace the letter D with the drive letter identified in Step 4).
Step 6: You will see the failures or unrepairable issues listed in the results. Insert the command SFC /scannow /offbootdir=D:\ /offwindir=D:\windowsand press Enter.
Step 7: Let the process complete and exit the command prompt window. Restart your PC.
Method 5: Use Windows 10 Repair-Upgrade
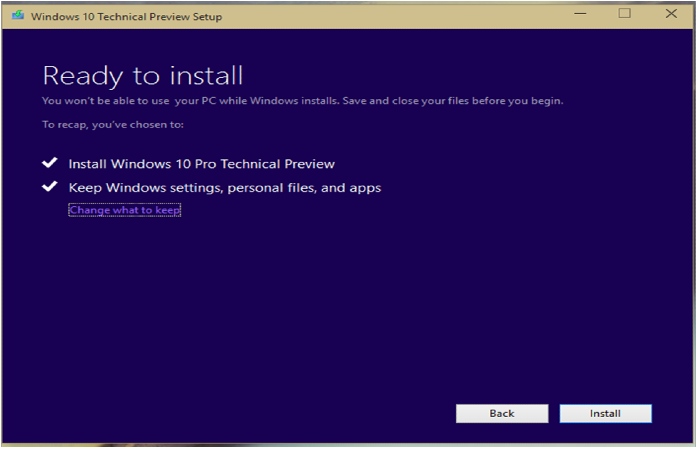
If none of the above methods solved the Windows Resource Protection found corrupt files issue, you are left with the final option to go, i.e., Windows 10 Repair Upgrade. It is the process of installing a fresh copy of Windows 10 over the existing Windows 10 OS on your PC using an installation media or ISO file.
Performing the Windows 10 Repair-Upgrade will rectify any issue with your OS while keeping your data, settings, and installed apps untouched. So you can download the ISO file from the official website or create an installation media. Once the media is ready, repair-upgrade Windows 10 on your PC.
Note: As the ‘Windows Resource Protection found corrupt files’ issue emanates from the critical system file corruption, there lies a potent threat of data loss on your Windows PC. If you have lost data due to accidental deletion or corruption, you can recover it using Windows data recovery software i.e. the Stellar Data Recovery Standard for Windows.
To wrap it up
The methods discussed above chosen based on their effectiveness to deal with the ‘Windows Resource Protection found corrupt files’ issue. Although, you must be cautious while using them as most of them are command-line methods, and if you fail to follow the exact instructions. You might face data loss or other errors on your Windows PC. We hope your Windows 10 PC is now up and running after implementing the fixes enumerated in this blog. Which method worked for you? Don’t forget to share.


